Lets face it. Photography isn’t always easy; and for that matter, neither is blogging when you are a beginner and all the technology is new to you. I believe that both should be demystified, however, so that more of those who truly love to take pictures and blog can enjoy success.
If you are reading this, chances are you’re a parent. That would mean you most likely take a lot of indoor shots of your kids. When that ‘Kodak moment’ lends itself, the lighting and background aren’t always what we moms and dads hope for. Quite often with indoor photography the pictures come out darker than you want even with your white balance set correctly. I don’t really like using the flash, so more often than not, my indoor shots are really murky.
The other day my daughter was standing in front of the quilted wall-art with her baby brother, talking to her big brother. Baby brother commenced to chew on her arm, making her laugh. Mom grabbed the Canon and started clicking. I didn’t want to miss the shot despite the fact that it was nearly evening and I wasn’t using a flash. The window provided enough light and my white balance was set to shade or cloudy (can’t remember which). I think I might have tried both of them on different shots.
After uploading the photos from the camera on to my laptop, I put them in their folder (I keep mine by year and month in folders on a separate external drive – and every time it thunders, I UNPLUG it from the wall). After looking at my shots, I picked a few favorites and started editing them. No sense in deleting a good shot if it’s too dark. There are ways to doctor your photos and bring out the best in them – even ones you really don’t think are salvageable.
The tools I use are FREE programs. I don’t get paid to review them, either. Although I’d love a sponsorship to BlogHer in case anyone is listening. This is the Welfare version of a photo tutorial, folks. For the higher end photo touch-ups, you’ll have to rely on people like Ree or Dawn. They have the expensive gear and software to back it all up with. Since I’m a photo-nut, “a girl has to do what a girl has to do”. Life isn’t going to stop happening long enough for me to become rich and buy expensive gear, software and college courses. I’m not planning on missing out on all the photos it has to offer while I wait for my photographic ship to come in, either. So if you, like me, are Photoshop and Lightroom wanna bes… and just haven’t had the time or money to buy, learn, and use the REAL tools… by all means, read below to find out how to quickly tweak your photos FOR FREE. Add some pizazz to your blogshots. It’s what the photo-hobos do.
I happen to know some designers out there who use these free services even though they have all the expensive software, anyway. So there.
So what do I use to edit my photos? The Poor Photographer’s Tools: Picasa, Picnik and Fast Stone. There are things that all of these do which are unique. It’s hard to pick a favorite. For example:
Fast Stone is a downloadable program that you store on your computer. I use Fast Stone to resize my graphics, crop graphics, add my signature to photos, and organize my pictures on my PC. It does those things the quickest and easiest. It also does many of the same things Picasa does – but Picasa has some cool features that Fast Stone doesn’t….
Picasa is another downloadable program that you keep on your computer – which has a nice organizational system for your pictures and is a super way to star your favorites and make collages. All of my photo collages come from Picasa. The collage feature, the favorites feature, and the one-touch “glow” effect are my favorite things about Picasa. I also think it’s neat that you can easily upload a set of photos to a webpage with Picasa. I’ve had to do that for some pictures I took for a church function and it saved me the time it would have took to save them on a disc and take them to someone.
Let’s not forget about Picnik. It’s my latest discovery. It’s very different than the other two because it’s an online service that has a bunch of free one-click actions that change your picture into works of art. It also has creative tools like text and “stickers” to make graphic buttons out of your photos. I have used this program to make small graphics for my sidebars when we have contests or give-aways.
Here’s an example of a graphic from a photo that I made on Picnik:
I changed the exposure and colors, added a frame, added a butterfly sticker, and added some text. The original picture is below:

My daughter actually took this shot. It was detailed and had good composition, but too dark to post. I edited it in Picnik and the edited version went on my “How Does Your Garden Grow?” post. Click over and go see it! It is so pretty that I kept a copy on my phone as a background.
I used Fast Stone to resize all of the pictures in this post and to add my blog name and copyright symbol. The editing of the photo past that was done in Picasa or Picnik; both of which do a great job and are user friendly enough for even a non-techie person to get around in. If you have a photo that you are planning to print for grandma, taking it for a spin through Picasa or Picnik would be a great way to make the photo POP and look more professional.
Take for example my dark evening photo-shoot with 7pm window light:
The first original of three I’m sharing today:

Cute photo, but here are some cool things I did in Picnik with it…

After altering the exposure and colors to brighten the picture and make it more vivid, I used the ‘Create’ tab and selected a few fun applications that automatically create artwork-type results out of your picture. The one above is called “Posterized”. Really groovy. You can play with it to get the exact look you are going for. The one below is called “Circle Splash”. It reminds me of a nativity picture. Baby K looks like Jesus with a Christmas-card glow.

Then we have another original:

I loved the way the baby was sucking on her hand and the animated expression. I didn’t like the fact that she had written on her hand in pen. Nor did I like the darkness of this shot and the coloring seemed a bit off. The baby also had a red spot on his cheek.
I did some edits in Picnik and in Picasa on this shot. Below each are the steps I took for the effect (of course, I can’t remember every little click, but the general gist is there):

The above was Picasa. I edited the exposure, highlights, color and then used the retouch tool to erase the baby’s red spot and her pen marking. All that took seconds. Much better looking already, right?

After that, (still in Picasa), I used the “saturation” one-touch alteration. It brightened up all the colors for me without me having to use my brain. I love a program that helps my brain activity… of which there is little after childbirth.

Here is the same editing in Picnik (online, mind you). It takes a bit longer since you have to wait for it to load. Like Picasa, all I did here was minor changes to exposure, temperature, color and contrast. And then I used the “blemish remover” tool – same as the “retouch” tool in Picasa – to remove the spot from baby’s cheek and pen mark from her wrist. A neat feature in Picnik that Picasa didn’t offer is the TEETH whitener! Move over red-eye remover. This one is a keeper! I do still plan to take the kids to the dentist, though.

Then comes the fun part. This is one of the “create” tab’s one-click actions called ‘Ortonish’. It kind of reminds me of Picasa’s “glow” feature, but you can really get artsy with it. There are a TON of neat one-touch actions on Picnik. It would take up all of Blogger’s bandwidth for me to sit here adding copy after copy of this shot. I use this particular one a lot.

This one is the “Cinema Scope”. Very fun. I also love the 1970’s, Pencil Sketch, Cross Process, Gritty, and Lomo-ish. The frames are also really nifty. You can round your edges, add a mirror-look, make your picture look like a postage stamp (like I did with the “Spring Flowers” graphic above)… etc.
Just with a few clicks. There’s no magic to it. Really.
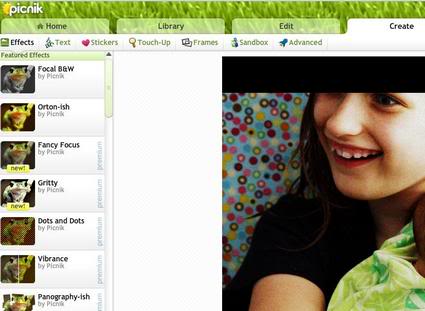
Here’s what the screen shot looks like when you are working in the creative actions of Picnik (for those of you who need a visual):

So clean and easy to use. Really.
And the third and final original. Really (then I’ll leave you alone).

I just love these shots. Almost as much as I love those kids. Miss M. is always holding her brother and he’s always chewing on her. It’s just so sweet. I couldn’t let this picture go to waste just because it was too dark.
Picasa to the rescue!

Four or five clicks… and a nice colorful glow.

Or you could antique a shot… make a black and white… whatever floats your boat.
The secret is out. Anyone can photo-edit with class… even if you don’t have Photoshop or Lightroom. If you aren’t a hard-core photographer and you just want to edit a few pictures here and there for your scrapbooks, prints, or blogging… why not give these programs a try. Come on. It’s better than deleting your photos.
Works for me!
Buzz

I’m getting ready to go on a Read Across America Road Trip where space will be at a premium. I’m planning to take a netbook, but was concerned about photo editing. Looks like Picnik will give me great options.
I’m wondering how it compares to other online photo editing programs. Have you used Photobucket?
Thanks for sharing! As a newbie blogger-wannabe, it’s great to be introduced to the tricks of the trade. Right now my blog is a text-only blog because we lost our wonderful computer and are too strapped to get another one. But I can’t wait to upload pictures one day. I have hundreds just waiting in the wings but no way to plug in an SD card to my computer. Big bummer! But I be sure to check out what you’ve shared!! Thanks again!
Sandra – Yes, I use Photobucket daily… however, I only use it to HOST my graphics for this blog, not to edit them. 😉 I’ve never used it for that, even though I have seen a few ads on there saying that it does allow for editing. You’ll have to let me know if you like it.
Jennifer – You can buy a little plug-in tool to put photos on that allows you to upload from any type of card. It’s cheap and easy to take along with you to the library, Kinkos, grandma’s house, etc. We keep one in our camera bag so that I can upload from any computer. Freecycle and Craig’s List are a great place to find used computer equipment, too. A friend of mine got a nice used laptop with a copy of Photoshop CS3 on it for 300$ on Craig’s List! Just the software was worth more than that.
Technically, if she doesn’t have the disks, she doesn’t have a legal copy of Photoshop whatever. people put lots of stuff on Craigslist computers, but I often wonder if they give you the disks and certificate of authenticity when they sell the computer.
Thanks so much for all the great info. I LOVE taking pictures, but don't have any fancy editing software (not that I wouldn't like to have some!). The sites you mentioned are definitely worth my time to look into. Thank you!
Don't forget Gimp! It's free, and has many of the tools in Photoshop.
http://www.gimp.org/
This is great info. I'm a newbie and I love taking pictures. I have been wanting to look into something like photoshop, but now I will check these out first.
Thanks again!
I love Picasa – a little too much and it shows. It works well with my fascination (obsession?) with posting every photo I take. I will have to check out Picnik. Thanks for the links. 🙂
Chewing on her arm! Awww. Such a cute pic.
I'm a Picnik fan! I love its features. 🙂